Make-Ahead No-Bake Chocolate Wafer Cheesecake: Your Ultimate Store & Serve Dessert Solution
Imagine serving a show-stopping dessert that looks incredibly elaborate, tastes divine, yet required minimal effort and can be prepared weeks in advance. Sounds like a dream? Not anymore! The no bake chocolate wafer cheesecake recipe is here to transform your dessert game, offering an elegant solution for busy hosts and sweet-toothed enthusiasts alike. This isn't just a dessert; it's a testament to convenience and deliciousness, perfectly marrying the rich indulgence of cheesecake with the satisfying crunch of chocolate wafers, all without ever needing to turn on your oven. Get ready to impress your guests and delight your family with a treat that's as simple to make as it is unforgettable to eat.Why Choose a No-Bake Cheesecake? The Ultimate Convenience
The allure of a classic cheesecake is undeniable – its creamy texture and rich flavor are a dessert lover's dream. However, the traditional baking process can be intimidating, fraught with worries about water baths, cracked surfaces, or simply the time commitment. This is where the magic of a no-bake cheesecake truly shines. It provides all the decadent satisfaction without any of the common baking anxieties. Our Quick & Easy No-Bake Chocolate Wafer Cheesecake Recipe allows you to skip the oven entirely, bypassing concerns about under-baked centers or overcooked edges. A no-bake cheesecake, especially one like our chocolate wafer rendition, delivers a surprisingly similar luxurious texture and that signature tangy cream cheese flavor you crave. It’s a foolproof option for home cooks of all skill levels, from beginners looking for an impressive first attempt to seasoned bakers seeking a stress-free alternative. Beyond the ease of preparation, the no-bake format means no heating up your kitchen, making it an ideal dessert for warmer months or when oven space is at a premium. If you’ve ever wished for a dessert that’s rich, satisfying, and refreshingly simple, then embracing the no-bake philosophy is your answer. For more innovative ways to enjoy decadent desserts without the heat, check out our guide on No Oven, No Worries: Decadent Chocolate Wafer Cheesecake.Mastering the Make-Ahead Marvel: Your Step-by-Step Guide
Creating this stunning no bake chocolate wafer cheesecake recipe is a surprisingly straightforward process, mostly involving whipping and artful stacking. The beauty lies in its simplicity, making it a perfect candidate for preparing well in advance.Prepping Your Workspace: The Foil Foundation
The foundation of your no-bake cheesecake begins not with a crust, but with a clever foil setup that will cradle your creation and facilitate both freezing and serving.- Start by selecting a sturdy baking sheet.
- Unroll a generous 30-inch length of aluminum foil and lay it lengthwise on the baking sheet.
- Repeat this with another 30-inch length, placing it perpendicularly to the first, forming a '+' shape. This creates ample overlap to fully enclose your cheesecake.
- Gently mark an 8-inch circle on the top layer of foil. This provides a visual guide for your cheesecake's diameter, ensuring a uniformly sized dessert.
Expert Tip: The foil isn't just for structural support; it's crucial for the make-ahead aspect. The loose edges will neatly wrap around your assembled cheesecake, protecting it during freezing and making transfer a breeze when it’s time to serve.
Crafting the Velvety Cheesecake Filling
The heart of any cheesecake is its filling, and this no-bake version boasts a light, airy, and incredibly rich cream cheese mixture.- Begin with a large, thoroughly chilled mixing bowl. Add two blocks of full-fat cream cheese, ensuring they are softened slightly to avoid lumps but still cool.
- Whip the cream cheese on medium-high speed until it becomes wonderfully light and fluffy, about 2-3 minutes.
- Gradually add 6 tablespoons of confectioners' sugar and 1 teaspoon of vanilla extract. Continue whipping until these ingredients are thoroughly combined and the mixture is smooth.
- With the mixer running on low, slowly pour in 1 cup of very cold heavy whipping cream. Increase the speed to medium-high and continue to whip the mixture. The goal is a cheesecake filling that is light, airy, and holds a firm peak – meaning when you lift the beaters, the mixture stands up without collapsing. This process typically takes another 3-5 minutes.
Chef's Insight: The key to a perfectly stable no-bake filling is using cold cream cheese (not rock hard, but not room temp either) and absolutely frigid whipping cream. This ensures maximum volume and a firm, sliceable texture once chilled.
Assembling Your Wafer Wonderland
Now for the fun part: bringing your cheesecake to life with layers of creamy filling and crisp chocolate wafers.- For the neatest presentation, transfer your cheesecake mixture to a piping bag fitted with a 1M star tip. If you don’t have one, don't fret; a large zip-top bag with a corner snipped off or simply a spoon will work just as well, though the finish might be less ornate.
- Using your marked 8-inch circle as a guide, pipe or spread a solid layer of cheesecake mixture to form the base.
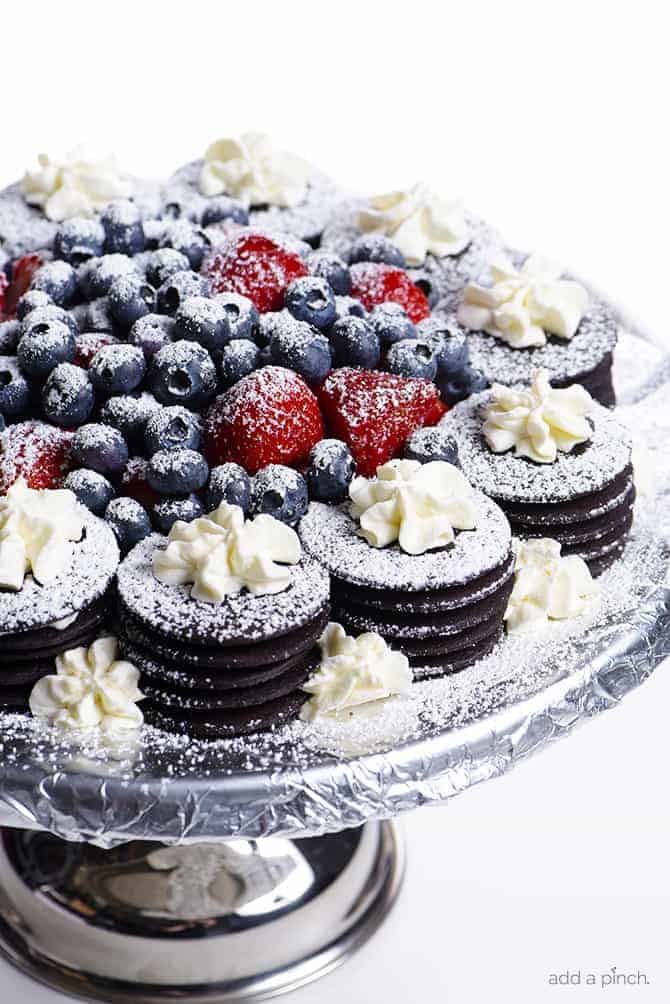
- Arrange 11 chocolate wafers on top of this cheesecake base, forming a ring around the perimeter.
- Place another dollop of cheesecake mixture on top of each wafer, then cap it with another chocolate wafer.
- Repeat this layering process until you have 5 layers of chocolate wafers, always finishing with a final dollop of the cheesecake mixture on top of the last wafer.
- For extra elegance and structural integrity, pipe an inner circle of cheesecake mixture within the ring of wafers. Additionally, add small dollops of cheesecake mixture between each stack of wafers on the outside of the ring. This not only looks beautiful but also helps to 'glue' the whole structure together.
Creative Twist: While chocolate wafers are classic, feel free to experiment! Vanilla wafers, thin graham crackers, or even chocolate cream cookies (like Oreos, as suggested by one of our sources!) could make delicious alternatives for a personalized touch.
The Secret to Stress-Free Serving: Store & Serve Wisdom
The true genius of this no bake chocolate wafer cheesecake recipe lies in its remarkable make-ahead capability and incredibly simple serving process.Freezing for Future Feasts
Once your cheesecake masterpiece is assembled, it’s time to put it to sleep until its grand debut.- Carefully gather the loose edges of the aluminum foil and gently enclose the entire cheesecake. Be mindful not to press down on the dessert itself. The goal is to create a secure package that protects it from freezer burn.
- Place the baking sheet with the foil-wrapped cheesecake into the freezer for at least 30 minutes. This initial chill helps the layers set firmly.
- Here’s the game-changer: once thoroughly frozen, this no-bake cheesecake can be kept in the freezer for up to two months! That's two months of knowing you have an elegant, ready-to-serve dessert at your fingertips, making it the ultimate make-ahead convenience.
Storage Savvy: For longer storage (beyond a few weeks), consider double-wrapping the foil package in plastic wrap or placing it in an airtight freezer bag. This extra layer of protection will guard against freezer odors and maintain optimal freshness.
Effortless Presentation: From Freezer to Fabulous
When the moment arrives to serve your spectacular dessert, the transition from freezer to table is seamless and swift.- Approximately 15-20 minutes before you plan to serve, remove the foil-enclosed cheesecake from the freezer. This brief time allows it to soften just enough for perfect slicing and enjoyment.
- Carefully unwrap the foil.
- With the help of the bottom foil layer, gently slide or transfer the cheesecake onto your chosen cake stand or serving plate.
- For a classic finish, artfully arrange a medley of fresh berries (raspberries, blueberries, strawberries work beautifully) in the center ring of the cheesecake.
- Finally, dust the entire creation generously with confectioners' sugar. Voila!
The result is a dessert that looks like it took hours, yet required mere minutes of hands-on time before its long, peaceful slumber in the freezer. It’s a stunning, simple, and utterly delicious way to conclude any meal.
